DIY Tuesday – Easy Halloween Costumes

Last-minute costumes!

You know that feeling when one of your friends calls you up and invites you to an early halloween costume party, but you haven’t decided what you’re going to be yet?!  Well never fear!  You can come up with AWESOME costumes with things you already have lying around the house!  Like I always say: Never sacrifice style because you’re a little short on time!

costume1

1. ZOMBIE

This one is super easy, and if you’re one of those people who had an awesome costume another year and are bummed you haven’t been able to re-use it?  Never fear, just be the dead version of it.  Prom Queen?  Zombie Prom Queen.  Mario and Luigi?  Zombie Mario and Luigi.  Sexy Bee?  Zombie sexy bee…ok maybe it doesn’t work for every costume, but it works for most of them… Continue reading

Dreamworld Saturday – Home Movie Theatre

A whole new meaning to “Home Movies”!

When I was a kid, my friends basement was redone and they built in a home movie theatre, and it was probably the coolest thing I had ever experienced in my life up to that point… well maybe not, but at the time, it was AWESOME.  I will one day build my children the most awesome movie theatre in our basement where they can bring their friends and have the best movie nights EVER!

movieOk, this is AMAZING, a bit out of my budget (A LOT) but how COOL for inspiration! Continue reading

DIY Tuesday – Hallowe’en Costumes!

Trick or Treat, smell my AMAZING costume!

I LOVE Hallowe’en.  There’s no way around it, I just love, love, love it!  It combines three of my favourite things: 1. Dressing up in costumes.  2. Watching Scary movies. and 3. Bite-sized candies.  I like to get REALLY creative with my Hallowe’en costumes, and since this year’s is still in progress, here are some of my past creations:

Picture 4Last year I went as Medusa!  With my hair full of snakes and some make-up to create scales around my forehead 😛 Continue reading

DIY Tuesday – Cheap DIY Teeth Whitening

My! What beautiful teeth you have!

Stars, commercials and magazine covers are making it increasingly devastating to have yellow teeth.  Everywhere you go you are faced with media telling you your teeth aren’t good enough unless they’re perfectly straight and perfectly white… well, let’s face it, all of these people in the media, with their pearly whites, have unlimited resources to keep them that way.  I don’t know about you, but I don’t have the money to get veneers ($1000-$2500 per tooth), in-office teeth whitening (approx. $650 per visit), a teeth whitening kit from the dentist’s office (approx. $200-$400), and I don’t even REALLY feel like buying the drugstore kits (approx. $25-$100).  So what’s my advice?  This is a two step process.

Picture 4

Day-to-Day Whitening

-mouthwash ($1-$8)

-hydrogen peroxide ($1-$6)

-baking soda ($2-$4)

-toothpaste ($3-$10)

Use a half and half mixture of hydrogen peroxide and mouthwash to rinse your mouth for about a minute.  Then brush with a baking soda/toothpaste mixture.  Mix a bit of toothpaste with 1 tsp of baking soda and 1/2 tsp of water until it becomes a paste.  Do not use these methods every single day, or you can wear down your enamel, which is no good at all, so maybe every few days or something?   Continue reading

DIY Tuesday – Homemade Art 101

It’s time for a big ART ATTACK!IMG_1088

Have you been to Homesense, or IKEA lately?  It’s a LITTLE bit outrageous what they expect you to pay for their mass-produced, so-called “artwork”.  Anywhere north of $50 for some abstract art you’re SURE you could do yourself, but can’t be bothered?  Well I say BE bothered.  I have given up on the art scene, and taken to painting ALL of my own artwork.  Well, not really my own, but getting inspiration from other artists, and reproducing it for my own home.  Now some may say, that’s easier said than done.  True,IMG_1083 it’s not easy, and it requires some patience, but I think anyone can do it!  So prove me right and just for it! Continue reading

Fashion Wednesday – Respruce, Reuse, Recycle!

“Don’t throw that out!”

Know those old clothes of your moms?  Or those hand-me-downs that are less than impressive?  Or those jeans that you LOVE, but are totally worn out in the crotch?  DON’T THROW THEM OUT!  OK, well, don’t be a pack rat either (trust me, I’ve gone there, some things actually aren’t worth saving…not many, but some).  I’m going to show you some of my most recent projects and give you lots of examples of what to do with those clothes that just don’t work anymore!

IMG_09231. JEANS

Are your jeans worn out in the crotch, but you still love them?  That just recently happened to me, and I got a brilliant idea: denim pencil skirt time.  I recently got rid of (aka donated or hand-me-downed) my only jean skirt, because I’d had it for years and it never looked good on me, it was an unflattering cut.  So I figured: I like how I look in pencil skirts…so why not try a denim pencil skirt?  And then the ripped up jeans just somehow fell in my lap…out of my drawer. And I made this skirt!

2. GRAPHIC TEES

Have those t-shirts you JUST don’t want to get rid of?  ALL THE TIME?! Me too, there are hundreds of ideas on Pinterest.  There are t-shirt “redos” and t-shirt crafts all over the place.  You can do anything from making a “favourite t-shirt quilt”, to an adorable off the shoulder comfy shirt, to making a too small t-shirt bigger. Continue reading

Mealtime Monday – Fall Food Is Among Us!

Sugar and Spice and Everything Autumn!

Hey everyone!  This week, my boyfriend and I made some REALLY delicious meals, and I cannot wait to share them with you!  They are both INCREDIBLY easy, inexpensive, one pot, delicious, and reasonably healthy, so how great is that?   I love using the flavours of fall as much as I can during the season, like sweet potatoes, and pulled pork!!!

meal SLOW COOKER PULLED PORK:

-2 lbs pork loin roast or tenderloin

-can of diet root beer

-500 mL bottle of your favourite BBQ sauce

-delicious BUNS

Put the pork in the slow cooker and pour the can of root beer over it.  Turn it on high and cook for about 6 hours.  Drain the pork, then shred after, this is very important because it’s MUCH easier to do it before… Once drained and shredded, pour the BBQ sauce over and keep on warm for 10 minutes.  Serve on DELICIOUS BUNS!  This was the easiest thing ever, and it makes a delicious, tangy, melt in your mouth pulled pork.  Continue reading

Fashion Wednesday – Fall Essentials of 2013

My Favourite Essentials for Fall!

Hey everyone!  Today I wanted to talk about my absolute favourite must-haves to feel good, and look great and how NOT to break the bank too badly when sprucing up your wardrobe this fall.

fall 1. The Riding Boot

I think that this one is fairly obvious…I mean, you can’t walk two blocks without seeing someone in their super stylish riding boots.  I had been looking for the perfect, aka most affordable, pair I could without sacrificing style or comfort!  I have large athletic calf muscles, so I’ve always had a rough go at trying to find boots!  I ended up getting an awesome pair at Urban Planet for $40, but I had to buy them 3 sizes too big!  I know that seems crazy, but they’re totally comfortable!  Look for your boots at similar stores, they may not be the very best quality, but if they last you for a season and they look good?  Who cares! Continue reading

DIY Tuesday – The Pretty Corkboard

“My, what a big corkboard you have!”

OK, so if you’ve been on Pinterest before…like EVER, then you know that making “pretty” corkboards, chalkboards and whiteboard are the latest and greatest thing.  They’re everywhere!  And they’re so good looking…soooo I had to make one… or two…

corkboard

Let’s be honest, this is a fairly straight forward DIY, so instead of showing you how, I’m going to focus on the different ways to decorate! Continue reading

Fashion Wednesday – How To Make Your Own Wire Headband

“On Wednesdays we wear pink…”

OK, so this is very exciting for me!  It’s my first Fashion Wednesday post, and I thought long and hard about what my first post should be, and the final verdict was… WIRE HEADBANDS!  You know those adorable headbands they have at American Apparel, that you could just die for…except that they’re $20!  Yeah, I’m sorry, I don’t love any headband $20 enough, unless it’s got diamonds in it (that’s an exaggeration, but you get the point).  Well, I love those little headbands, and one day I decided to try to make one, and it didn’t turn out half bad, so I continued to make them and they seem to be the easiest little sewing project ever.  Here’s what you need:

IMG_0976

IMG_0966

Materials:

-scrap fabric at least 7″ wide and at least long enough to go around your head plus about 3 inches extra

-wire.  any old wire, it’s easy to find at craft stores or tool stores, this needs to be the same length as your fabric.

OK, so the first step is folding the right sides together, so that your head band is inside out.  Sew your headband together lengthwise so that you end up with a long tube of fabric.  Then sew closed ONE of the ends of your headband.  Once you have done that, turn your headband right side out

IMG_0967

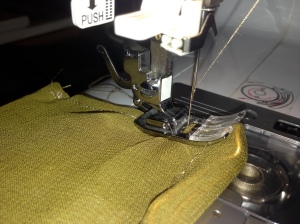
Sew with the “wrong” side facing out

IMG_0968

Now insert your wire and make sure it goes all the way to the end of your headband and that none of it is sticking out, it should end a couple of centimeters on the inside, as you will need to close up that seam once you’re done.  I tend to make my wire a little bit longer and bend it, so it’s not pointy and doesn’t rip the headband once it’s done.

IMG_0969

Now that the wire is inside, carefully sew the a stitch about 1/2 an inch wide to encase the wire.  You may prefer to sew this casing before inserting the wire, I just prefer to do it this way for some reason 😛  Make sure you go slowly, this stitch will show on the outside, so it’s a bit nicer if it’s straight!

IMG_0971

Once you have the wire sewn into its little pocket, you can fold the open end of the headband inside itself and sew it closed, I usually sew this stitch about 2 centimeters from the edge, I like it to be right near the edge.

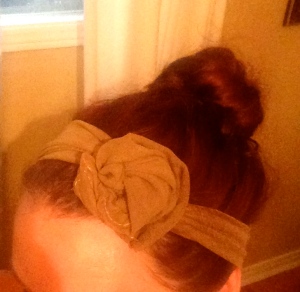
And now your headband should be done!  Seriously, it’s as easy as that!  I think that these headbands are WAY too cute, and I wear them ALL the time.  You can wear them a variety of ways, here are just a couple of the ways that I usually wear them:

IMG_0972 IMG_0975All in all, this craft is DEFINITELY a MUST-DO!

Oh, and here’s a Handy Tip:

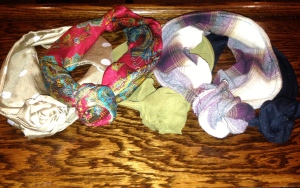
You can use all kinds of cool fabrics to make your headbands!  I like to go to the second-hand store and find unique fabrics to make these.  (The polka dot headband was a pillow, the red headband was silk pajamas, the green headband was the lining of a skirt I already had (so now they match perfectly 😉 ), the plaid headband was an old flannel shirt, and the black headband was scrap fabric from a previous project!)

IMG_0977

Thanks for reading!